As you guys may remember from my last beauty post, I am pretty lazy when it comes to hair and makeup. I rarely use a hair dryer because I don't really know what to do with one. And my version of an updo usually consists of some sort of ponytail or messy bun. So I love it when people who know what they are doing in the hair department teach me some skillz (yep, the "z" means we mean business). The girls from Irrelephant were in town recently and taught me how to create this easy floral updo which took less than 15 minutes and looks so, so pretty. It's perfect for upcoming Valentine's Day…or really, any day that you just want a little extra floral pep in your step! Here's how…
1. First start by prepping your hair. Any updo stays longer when there's a little grit in your hair using hair spray or texturizing spray. If you have straight hair like I do, curl the hair loosely with a curling iron and then break it up with your hands. This adds texture and volume to start the 'do off on the right foot.
2. Begin by picking up top crown section of hair (the section that starts around your temple) and tie it with a small clear rubber band or pony tail holder.
3. Flip the pony inside out like a topsy tail!
4. Next, grab the hair that's left over and tease it with a comb. Grab a one inch section from the left side and pin it over to the right past the pony tail part. Grab one inch of hair from the right side and pin it over to the left past the pony tail and place a bobby pin or two to secure.
5. Continue and repeat #4 by pinning over another section of hair from the left and right sides and pinning them to secure.
6. Once the top part is secure, divide the remaining hair at the bottom into two sections. Tease one section and roll it under up into the base of your head and pin until it's secure. Repeat on other side until your updo is complete. Spray with hairspray to set.
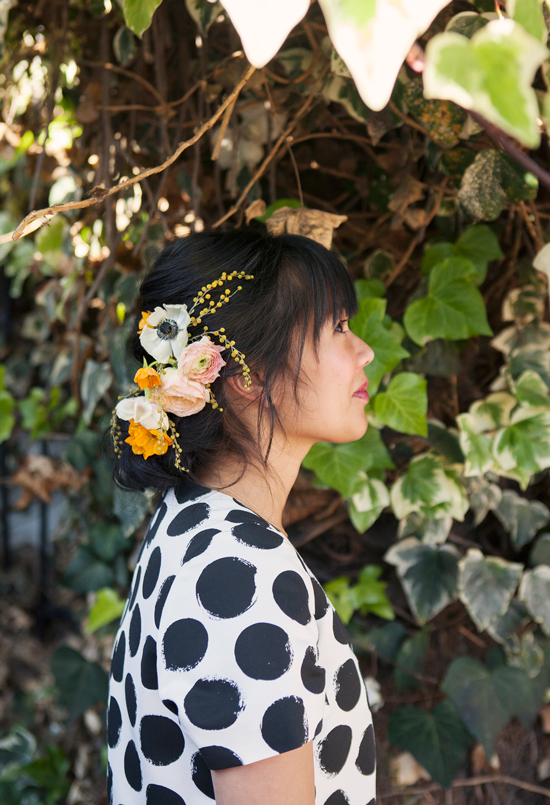
7. To add flowers, snip the stems to a couple inches in length and use bobby pins to secure the flowers in place. You may need some help for this part, or you can feel it as you go, and pin the flowers as you like…the more free-flowing and organic, the better! We chose softer flowers that would also look pretty as they wilted so that you can go a for a day or evening with them on your head.
Enjoy! Let me know what you guys think. And if you try it, I want to see! A special thanks to Joanna and Molly at Irrelephant for helping me figure out this whole hair thing…
{Photos by Casey Brodley. Updo by Irrelephant. My dress is by WHIT.}
That looks pretty and is another interesting way todo your hair. Thanks for the tutorial!
so gorgeous. i love your beautiful hair.
I’m very lazy with my hair too. I don’t even like spending a lot of time at the hairdressers 🙂 I’ll try this some time.
Soooo beautiful!!
wow, that is seriously wedding-worthy.
so beautiful! you all have the best blooms in CA 🙂
Molly {Dreams in HD}
http://www.dreamsinhd.blogspot.com
looking beautiful mama.
I’m always looking for incredibly easy ways to do my hair that don’t LOOK easy! This is unique and I have to say, I just love the word Irrelephant. ;]
Lovely updo! Thanks for the step by step instructions. I am not good with my hair either and this is so helpful. It will be great for a wedding or baby shower.
so pretty, delicate and feminine!
http://semiweeklyeats.blogspot.com/2014/01/work-outfit-7.html
So cute! This would be great for weddings!
So gorgeous ! I’ll try it for sure, you look so lovely 😉
Stunning!
Oh my gosh! This is just adorable! I’m so lazy with my hair and this is not too hard for me…which is fabulous. Thanks for sharing!
This is gorgeous! Currently in the process of growing out my (very damaged) hair. One day soon I will be able to do this!
😉 thank you!
That’s an OMG that deserves all caps!! Oh if only I had that special touch with hair!
SO pretty! Plus I love the combination of your floral hair and polka dot top!
Wonderful! Thanks. This is really simple + cute.
oh you look like a princess from Bali! 🙂
seriously love this look! the irrelephant girls are AHMAZINGGG <3
http://www.flowercrownsociety.com
Oooh, you look so beautiful! It’s pretty even without the flowers, but they do add that extra special touch. I think I may have to try this for a fancy charity event coming up. I’ll send photos!
Wish you had done a video!
This is a stunning up do! You make it look so simple too! Thank you
goodness that is pretty!
so beautiful! now I want to try it 🙂
I’m not one to put much effort in doing my hair, but this definitely looks like it’s worth a try! It looks beautiful! Thanks for sharing!
whoa, that looks super easy! Let’s see how it works on my curly hair, thanks, very cute.
SoooO pretty, Joy! And you picked the perfect flowers to add 🙂
Love the updo! Could I ask what kind of flowers you used? Thanks so much!
Hi Kaela,
We used ranunculus (pink) and anemones (white). I am not sure what the others one are but we are trying to find out!
Joy
ps.
yellow hanging flowers: Acacia
orange flowers: Star of Bethlahem
😉
Thank you so much for quick reply, Joy! Your blog is such an inspiration for living a creative and colorful life!
I love this!!! Such a pretty look.
That is STUNNING!
This look is amazing, I wish I could pull this off!
Love it!!
So gorgeous, Joy!
I love the top image of you! Makes me want to paint it! So fun.
So pretty, Joy!!! What a great idea for a date night or fun day out with friends. I think wrist corsages are due for a comeback, too.
SO PRETTY <3
http://www.aboutfoood.com
So beautiful.. Fashion with natural flower.
Oh so pretty! I love the unusual flower colour and combo contrasting with your hair!