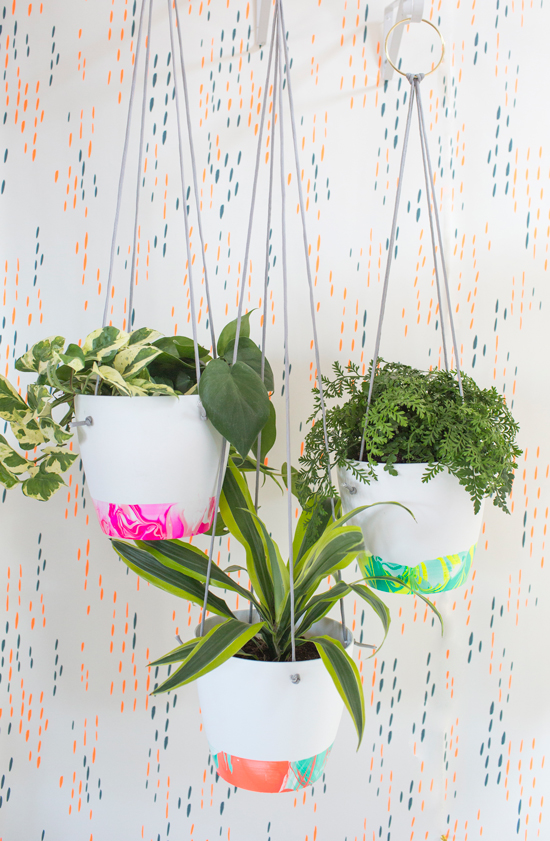
I remember when I was growing up, my parents had a window full of hanging plants that I used to help them take care of. There was something so fun about watching them grow and how they would bring so much visual interest to a room. I wanted to recreate this for my home, so here's a fun way to make an easy and beautiful hanging planter that I wanted to share with you. To create a beautiful way to display these plants, today we’re creating these dipped, marbled planters…
You’ll need:
For marbling:
-nail polish (we alternated between 4 different colors – 2 per pot)
-large shallow disposable container, tub, or bucket
-room temperature water
-a stick like a skewer or toothpick
-white plastic plant pots
-clear matte finishing spray
For hanging the planters:
-hanging rope (550 cord in gray)
-drill
-3’ gold embroidery ring
For planting:
-potting mix
-plants of your choice
I used to love marbling paper as a kid, so we're going to apply the same technique to the bottom of these simple white containers to hold your potted plants. These can be purchased at a local home improvement store for under $5 each.
Here’s how:
1. Fill disposable container with room temperature water. (You need to use room temperature water to slow down the hardening process of the polish)
2. Gently pour the nail polish onto the water (pour as closely to the water as possible – if you start pouring too high the nail polish will sink to the bottom) and work slowly. The polish should float and continue with alternating colors.
3. Use a stick to create your design in the polish. Start in the center and move out – you will have to do this quickly so the polish doesn’t harden. And don’t worry about being too scientific about it, the looser, the better.
4. Submerge the white plastic pot in water and then pull it out. If there are gaps or you want more marbling you can repeat the process. Let it dry for at least 30 minutes. You can use nail polish remover to remove any nail polish on the sections you don’t like and start over if it got messed up.
5. Once dry spray with a clear matte finishing spray.
To add rope to the planters, you’ll need:
-Hanging rope
-drill
-550 cord in gray
Using the materials for hanging the planters, then:
1. Drill multiple holes at the bottom for drainage.
2. Drill 4 holes near the top rim an equal distance apart from each other. It will need to be big enough for the cord to string through.
3. Cut 2 cords to the same desired length. I cut mine to 4 feet so that once folded, you have 2 feet in length for the planter to hang (You can make it longer or shorter depending on the length desired).
4. Fold the cords in half and loop them through the gold embroidery ring
5. String each end of the cords (you’ll have 4 in total) into the holes of the pot and secure with a double knot.
Now it’s time to add your plants with potting mix and plants of your choice.
Depending on if you’ll be keeping them inside or outside, choose plants based on location as well as the amount of sunlight you’ll get in the area you plan to hang them.
And then:
1. Release the plants from their existing containers and loosen the roots.
2. Fill your new pot with potting mix. Miracle-Gro® Moisture Control Potting Mix protects against over and under watering (which I am often guilty of).
3. Then incorporate the plant into the potting mix.
Depending on your climate, they can be kept indoors or outside. Just be sure to check the specific type of plant and their sun requirements.You can keep these inside year-round in the kitchen or living room in any area with indirect sun to bring a touch of your garden inside!
*This post is brought to you in collaboration with Miracle-Gro. All content, ideas, and words are my own. Thanks for supporting the sponsors that allow me to create new and special content like this for Oh Joy.
{Photos by Casey Brodley and crafts/styling by Julia Wester for Oh Joy}
These look lovely, I hadn’t thought of puttint hanging baskets indoors. They really look great
I’ve seen this on nail before, but never on pots! I love the bright colours – the possibilities are endless.
So cute! I have got to try doing some of these because I have tons of nail polish sitting around!
So I tried to do this exact same DIY project for my blog about two months ago, and it was a complete failure. My nailpolish wouldn’t marble nicely and dried on the water before I could get it on the pots. I wish I could tell what you’re doing differently, though, because yours look great! Any ideas? Perhaps I’ll have to try again. Thanks for the inspiration!
This is pretty great. One of my favorite DIYs on this site so far!
Hi Joy. What is your source for the white plastic pots? I’ve been shopping for simple plant pots with no luck.
Hi Rachel,
You have to do it very quickly because if you wait too long the nail polish will solidify on the surface of the water.
Also, make sure your water is room temperature and not too cold as the cold water makes it harden quicker too.
If you have everything right there next to you that helps to make the process as quick as possible!
Let me know if that works for you!
Joy
This is awesome! I recently did a water marbling project with nail polish with my middle school art students and they loved it!
These planters are so adorable! I cannot stop drooling over the pop of neon color. Such a great DIY idea. I have to try this soon!
Rachel
http://rachelinflight.com/
Thank you!
Joy
I am new to your site and am enjoying it immensely. You are an adorable pregnant person by the way! I was wondering if that was wallpaper behind your lovely plants and if so, what the source was? It’s great!
Thanks so much Stephanie!
The wallpaper is linked at the very bottom of the post and it’s by Juju Papers:
http://jujupapers.com/
Best!
Joy
Where oh where is the wallpaper from in your title image? I’m drooling over it 🙂
Hi !
I’ve tried it before but some bubbles appear in the polish and then it doesn’t look so pretty. Any tips please ? Thx
Hi Alex,
Trying pouring the nail polish into the water closer to the surface. If you pour it up too high, that might be causing the bubbles.
Thanks!
Joy
Cute idea….. But i certainly wouldn’t waste my nail polish doing this…polish isn’t cheap!!
Hi! We just used the cheap nail polish at the drug store that’s $1.00. And you don’t even use a whole bottle for each pot.
Joy
Hello 🙂 cute idea! Do you tape off to get the crisp edge and dry upside down? How does it not drip? Thanks 🙂
Hello!
No taping is needed as the edge is formed from the dipping. And the nail polish dries super fast so it won’t drip.
Best!
Joy
Do you have to use a white plastic pot? Can you use terra cotta?
Can this effect be achieved with porcelain paints do you know?
Can this be achieved on paper with nailpaint?
Wow! This is amazing! It’s so much fun to do that. With just little amount we can create a great DIY hanging planter. Cool.
These pots a pretty. I’ve seen this done with white coffee cups. Is this safe for dishes & cups to eat & drink from? Thank You for the project I will be trying this for gifts.
These plant pots are amazing.
the article you mentioned helped me greatly. thank you for the information
Google Chrome 2020 is a web browser that incorporates a marginal style with innovative innovation to make the internet much faster, more secure, as well as simpler. Utilize one box for every little thing enter the address bar and also obtain pointers for both search as well as Website.
A very interesting piece. Easy to understand and fun to read. Thank you for bringing color to our imagination. I’ll try this soon.
Thanks so much Ivy!
Joy