I love open shelving in kitchens. It reminds you what you have in your kitchen and makes it easy to see and find things. The kitchen is one area that often gets neglected when decorating a home, so we wanted to show you a super easy way to bring a bit more color into that oh-so-important space (I mean, that’s where food is made and consumed, and food is probably one of my favorite things on earth!).
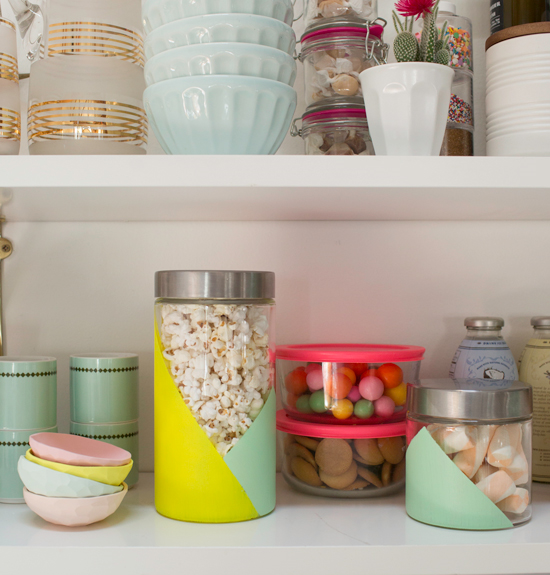
We made these neon blocked jars that are perfect for holding dry foods or other loose items that need to be contained. The cool part is, you can paint your jar to cover as much or as little as you want and show off the foods that you want to see (and those you don’t mind others seeing as well).
Since most of mornings can be crazy with getting two kids fed, dressed, and ready for the day before work, I recently started using a Keurig 2.0 Brewer to make the morning a bit easier and get my kick of caffeine on the go. These jars have come in handy for also holding the little cups with all the different K-Cup pods (I’m partial to the tea and iced coffee options but there are over 400 different beverage varieties from 60+ brands available within the 2.0 system). I love the white one to serve as a neutral for the accents of color I add in elsewhere, but the system also comes in a ton of other colors including Vintage Red and Pantone’s Color of the Year Marsala.
Here’s how to make these Neon Blocked Jars…
You’ll need:
–acrylic or glass paint (glass paint will make it more durable and washable)
-paint brush
-painter’s tape
Here’s how:
1. Decide how short (or tall) you want your angled color block to go and use painter’s tape to tape off the area above it so that you have a clean line for your edge below. The tape will look like it’s at an angle on each side and then come to a point where the edges meet. (show a photo of the front as well as the side where edges meet) The higher up you place the tape, the more paint you’ll use to coat the bottom portion of the jar.
2. Use a brush to paint the lower portion of the jar where it’s taped off. Let the paint dry.
3. You can stop there or if you want, add another color in the opposite direction (show photo with the two colors) by adding a layer of tape in the opposite direction and painting on the other side. We used neon colors for the larger color block and softer pastels for the smaller color blocks. Let the 2nd layer dry.
4. Now fill them with items of your choice to help organize your kitchen while also making it extra colorful!
P.S. Keurig is offering a special reader discount for 30% off a Keurig 2.0 Brewer and beverages. Simply enter "OHJOY" at checkout through May 30th (Available only to the first 200 people who use the code). With Mother’s Day just around the corner the Keurig 2.0 Brewer makes for a great gift! It’s the first Keurig that brews both a single-cup and four-cup carafe, perfect for all of mom’s entertaining needs.
This post is brought to you in collaboration with Keurig. All content, ideas, and words are my own. Thanks for supporting the sponsors that allow me to create new and original content like this for Oh Joy.
{Photos by Casey Brodley, styling and production by Julia Wester for Oh Joy}
This looks really really nice! I will copy! My kitchen needs some more colour….Thanks for the idea!
I love this! What a fun way to add some personality to your kitchen!
Kristi
http://www.beloverly.com
I am just working on redecorating my kitchen and it looks so cheerful and fun. Thanks for inspiration.
http://www.stylecharmer.com
This is so cute!
Joy, I think you left your notes to yourself about the photos to include in steps 1 and 3.
Joy, how bright and fun. I love it!
Simple & chic! I love it.
How pretty!! A touch of neon is always a good look!
I love the colors of your kitchen. And yes, I adore open shelving as well. It brings that rustic country home feel to a space.
The Peculiar Trouth
Great way to jazz things up in the pantry! As for Keurig, I’m reluctant to try it because the plastic cups seem so wasteful — even the inventor regrets coming up with the idea because of the environmental impact. http://money.cnn.com/2015/03/04/news/k-cups-keurig-inventor-regrets/
This looks really colorful and pretty! Also, since open shelving can get a bit dusty, a closed box is a nice option.
Where is the donut print in the first picture from?
Ah, I have to agree with Lydia. We have a Keurig at my office and we’ve all committed to using a reusable K-Cup instead of the pre-packaged pods.
Beautiful colored jars! Great idea! Thanks for this DIY 🙂
Alina
http://www.eclecticalu.blogspot.com
These are so adorable! I totally want to do it, I’ve been thinking a lot about how to make my kitchen a more playful space so that I want to spend more time in there! xo
Love those containers! They add such a great pop of color. Seriously not a Keurig fan though. I was about to get rid of mine completely but I may give the reusable cups a go.
I love the DIY! It’s easy to do and I can’t wait to try it!
Thanks Daniella!
Joy
Love how bright and colourful the containers are! Makes the kitchen a much more exciting place ^_^ ♡
I would love to try this- what a great, accessible idea with a big design impact! Beautiful! However, I am so glad to see so many anti-Kreuger notes- there are so many (non-plastic!) ways to make coffee- plastic sucks.
Joy, you are a constant inspiration for and influence on many of us, so I hope that you might reconsider the K-cups. An electric kettle would just as easily make tea; add a pour-over coffee system and you’ve got a good, quick cup of joe without any of the environmental (or potential health) hazards. At least please look into the more earth-friendly cup options. Thanks on behalf of your eco-conscious friends and fans!
Thanks so much for that! I will keep that in mind for sure. And there are reusable K-cups as well that we’ve been using!
Joy
Open shelves look nice but they get extremely dusty and things fall off both ends. Doorless cabinets are much more practical for the same look.
Gorgeous! So simple but so fun. I am in love with the moulding under the cabinets too! Such a fun, unexpected touch.
Christine | DimesandDonuts.com
Hello, Joy! I have found your blog accidentally, but I am in love with your articles. I have a small kitchen and everything is cluttered. I will use your ideas to make my home a more pleasant place. Thanks for being such an inspiration to all of us 🙂
any smart ideas or solutions that have made your life in the kitchen better and easier.
Love the idea for the jars! So cute!
I hate the Keurig. The coffee tastes so gross and it is wasteful. (Sorry!)
I make iced coffee now (and sometimes buy the big jugs) because I am not a morning person and it’s easy to do ahead and have enough for days.
I loved your idea on decorating jars. (with the slant ones) With this one can maintain privacy to some extent. The design provides eye pleasing effect. that’s for sure.
I will share this tips to my friends as well.