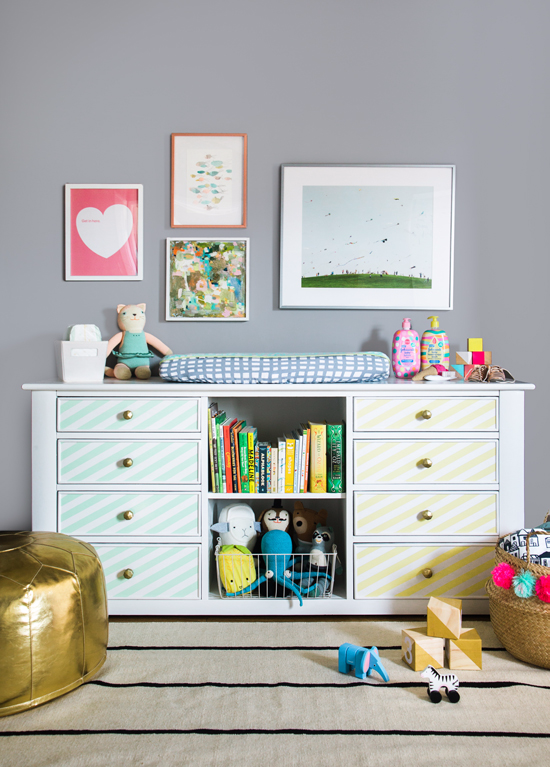
Our Creative Producer & Stylist, Julia, has had this dresser in her home for over 10 years. Her husband purchased it as his first "adult" piece of furniture. It's moved with him through several different apartments and now finally into his current home with Julia and their baby Zealand. Hoping to bring new life to the old dresser, Julia wanted to "Oh Joy it up" by refinishing and repainting it for her baby's room.
See how this dresser transformed from a drab antique to this modern and playful piece…
You'll need:
- Benjamin Moore Advance Interior Paint (we used mantis green and sundance yellow)
Here's how:
1. Start by sanding down your dresser because the existing varnish needs to be removed to paint over it. Then spray paint the entire dresser and drawers with the spray paint primer. Let dry over night.
2. Once the primer is dry, paint a thick coat of white Advance Interior Paint. This paint takes 10-16 hours to dry and cure. The thicker the coat the more protection your dresser will have. We did 3 coats. You may need to sand in-between coats (using low grit sand paper) if there are any visible drip marks.
3. When all coats are dry you can start painting the stripes on the drawers. We used the .94 inch blue painters tape and covered the entire drawer with diagonal lines so that the lines would be consistent and even.
4. After all the drawers are taped, remove every other strip of tape to expose the areas you want to paint in a different color. Often when using painter's tape, the new paint color can bleed under the tape. To prevent this bleeding and to create a crisp line, we first painted over the entire drawer (exposed area and tape) with a thin coat of white paint.
5. Let that dry for at least 10 hours then paint over the drawers with your desired color. We chose to paint a mint green on one side and a pale yellow on the other. We chose to add a second coat of paint after the first coat dried.
6. Once completely dry, remove the painters tape and add your knobs.
The great thing about a dresser is that it's a piece that can go from changing table to dresser to storage, staying in a child's life for a very long time. It's pretty cool to see a piece that was purchased by a single guy 10 years ago now turn into a piece with which his daughter will grow.
*This post is brought to you in collaboration with Johnson's®. All words are my own.
{Photos by Mary Costa, styling by Julia Wester, crafting by Julia Wester & Dave Wester.}
Wow what a great change!! Love it!
xx Caroline
https://carolinespassion.wordpress.com
Good Job, Julia! You crafty minx.
Beautiful, but a little sad to see that gorgeous wood covered with paint!
I guess after 10 years change is good.
So great! Do you have a source for that Kite print?
Why are you so brilliant?! Seriously! I love everything that you post and this DIY is making me want to do it like… yesterday! Also, please tell me that the gold ottoman/bean bag is from your collection. How do I get my hands on one?!
HI! Thank you!
The gold pouf can be purchased at Serena Lily 😉
Joy
I agree. I have very mixed feelings on painting wood. I love what the finished piece looks like, but I also love the look of the wood. However, I embrace the thought that change is good. And it is really cheerful now. Great job!
Love the DIY projects, they are my favorite. We got a great piece at a garage sale and redid it and it was so cute – gives new life to old pieces
I’m loving the kite print too! Please, please tell me how to find it.
Hi! It’s by Paul Octavious. Not sure if that exact one is available but this is similar:
https://20×200.com/products/paul-octavious-kite-hill
Joy
Thanks for this. I got something similar to the kite print. Where can i find that exact one please?
These upcycling examples are truly inspirational.
Very impressed!