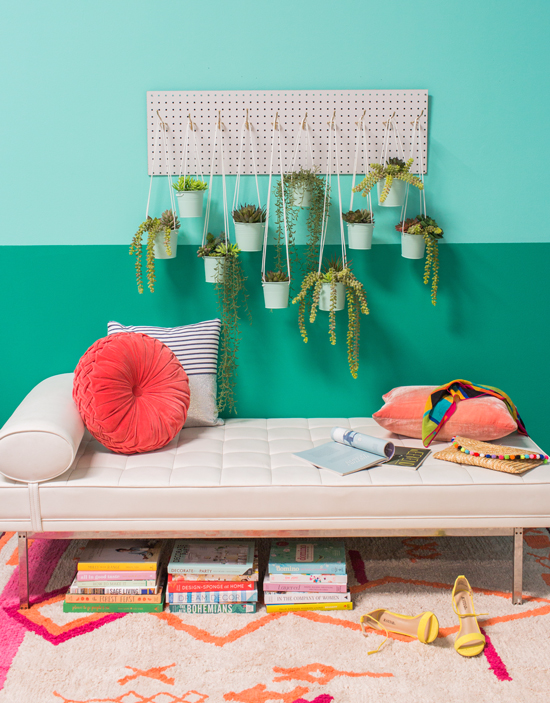
We're always looking for fun ways to bring plants into the home. Today, we have this versatile Peg Board Hanging Planter which allows you to add as many plants as you want! Here's how…
You'll need:
- metal planters
- parachute cord
- peg board (cut to size of your choice)
- pegs
- gold spray paint
– drill & drill bit
Here's how:
1. Hang your peg board in the area you want your planters to go.
2. Spray paint the pegs and let dry for 30 minutes.
3. With a pencil, mark where you want to drill holes in your planter cups. You'll need two on each side (4 holes per planter), about 1-2 inches apart.
3. Drill holes with drill bit.
4. String parachute cord through all four holes to make two loops, from which the planter will hang.
5. Secure ends of the cord with a knot. We decided to stagger the lengths of the of the cord, but you can also easily adjust where you tie the knot to have them all hang at the same length.
6. Insert your plants, and hang on the pegs in the peg board!
Items shown: Benjamin Moore Bermuda Teal paint, Benjamin Moore St. Patrick paint, Modernica day bed, Urban Outfitters round pillow, Persifor striped pillow, vintage velvet pillow, vintage scarf, Anthropologie clutch, Lorena Canals rug, Just Fab shoes.
{Photos by Casey Brodley, styling by Julia Wester, and crafting by Jess Hong.}
Love, love, love! What a brill idea. I’m away to share.
OMG I almost fell off my chair! I am so making this for my home!
Off to the hardware store now!
http://www.sandrabestdecor.com
wait… did you install the peg board directly on the wall or is it offset by something (like wood strips)?
Hi Sandra,
We nailing the peg board directly to the wall.
Can’t wait to see what you make!
Joy
The last time I used peg board, I had to use wood strips between the peg board and the wall. The hooks needed a little empty space past the peg board.
Love! Making for our NYC apartment! What are those hanging succulent plants?? So rad.
Hi Megan,
They are calledString of Bananas, Donkey Tail.
Best!
Joy