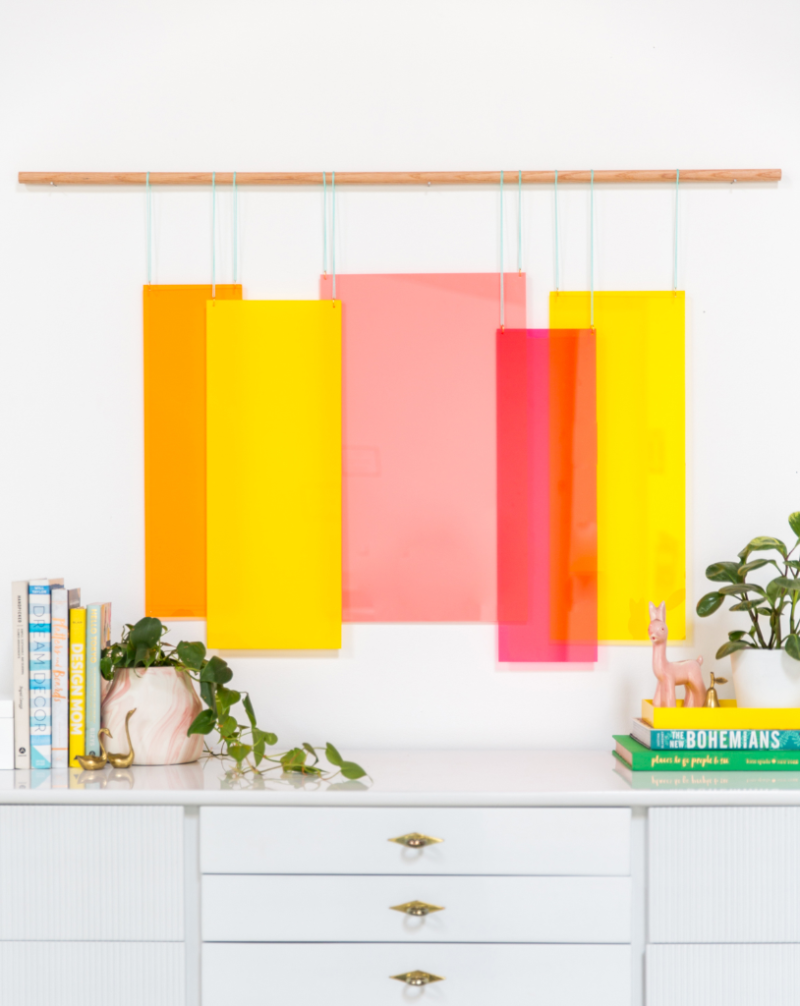
I love wall hangings as an easy way to add color and texture to a room! Remember when we showed you how to make one with beaded rope, another with velvet ribbon, and one with painted plexiglass?! They're an inexpensive alternative to buying a large piece of artwork, and you can customize them to fit perfectly into your color scheme or aesthetic. So, today, we're showing you how to create one with colorful acrylic panels! You can use any color combination you want, but we picked warm and bright tones for summer. Here's how…
You'll need…
– wooden dowel
– electric drill
– drill bit
– acrylic panels
– nylon thread
– jump rings
– pliers
– dry erase marker
Our acrylic panels measure as follows:
transparent yellow & opaque yellow: 8.5 x 22"
transparent pink & transparent orange: 6.25 x 21"
opaque pink: 13 x 22"
but you can customize to any size you'd like!
Here's how…
1. Measure about 1/4" from the top and side edge of the acrylic piece and mark with a dry erase marker (it will easily wipe away if you need to re-mark your dot). Repeat on the other corner.
2. Drill where you marked each corner.
3. Use pliers to open a jump ring and feed through each hole. Use pliers to close the jump rings.
4. String nylon thread through the jump ring, leaving yourself plenty of extra string (at least 12", but it can be longer depending on how you'd like to stagger the height of your panels).
3. Wrap nylon once around dowel and and finish with a knot. Repeat on the other corner, making sure that the nylon lengths are even so that your panel is level when it hangs.
5. Repeat with each acrylic panel so they hang at various levels and overlap slightly.
Sources shown: Ai Modern credenza, Anthropologie marbled planter, vintage brass swans, vintage pink ceramic alpaca, vintage brass pear.
{Photos by Marisa Vitale. Styling by Wilmarose Orlanes, styling assistance by Jess Hong.}
Lately I have been saving a lot of diy ideas! This one is great! Maybe i should try this 🙂 the result looks good and definitely worth the effort and time
Ellaine | In Betweens
Thanks Ellaine!
Joy
Fantastic idea and instructions- would look great for a screen in front of a window… plus the colors with the light hitting it could be magical. Thanks for another wonderful project!
Thanks June!
Joy
Stunning!
These are great!!! Would you mind me asking where you got the panels from?
Hi Scottie,
They are linked to in the materials part of the post!
Best,
Joy
Explore and Shop from our wide range of Indian wall hanging collection at various colors and design at Ashvah.
How these simple acrylic panels make a difference!